
Guides Repairing K24 and K20 Engines:
This section covers K series engines found in Honda CRV, Element and other Honda Vehicles Including Accord, Acura TSX, RSX, Civic SI and more.
This does not cover the diesel variants found in UK and Asian Markets.
This is based on my experience and education on working for Honda Dealers and building performance Honda engines for 20+ years.
scroll down for other platforms including MDX, RDX, Pilot and Others. This getting written updated regularly and there is ALOT of info to put in here so be patient.
The Honda K series engine at the core is a great engine and its why there are so many K swap vehicles out there that are Honda and non Honda. But some of the accessories strapped to it have a few issues as well as some internal issues.
A few of which are things like oil consumption, the I-vtec system and the variable cam system and things like the Knock sensor and some of the gaskets leaking like a sieve.
There are however a lot of things you can do to prevent any of the above issues by doing some preventative maintenance. Unfortunately that is not always possible and the age of the vehicles you have no idea usually what has been done and what has not been done. So when these problems come up lets talk about how to repair them, what you should repair at the same time and what kind of parts you should be using.
Engine:
The K24A1, K24A4 and K24A8 Engines Found in 03-11 Honda Element and 02-10 Honda CR-V are are basically the same with the exception of Intake and exhaust manifolds and some of the electronic management systems. Internally and mechanically they are almost exactly the same with variants on the cam profiles and VTC gears. (variable timing control actuator) Found on the Intake camshaft. The K24Z Engines found in later models are the same with the one major difference of having 1 single exhaust port on the cylinder head vs standard 4 port. But the same rules apply for the internals.
Lets start with the basics:
Miss firing/Lack of power
Typically there will be a code telling you what is going on, when your check engine light is flashing this is a sign of a miss fire. You can have an auto parts store scan you for free or you can buy a cheap code scanner and it will tell you the story. If it is not saying a sensor is to blame usually it will just say a miss fire and what cylinder it is. If you have a rough running vehicle that lacks power its probably time to tune up that K series engine with the basics.
Spark Plugs:
K series engines rely on having good plugs in them. You cannot wait until they are worn down to nothing before changing them because it effects your fuel economy. You need to use NGK or DENSO plugs do not even attempt to buy the budget plugs like autolite or champion because they just do not work as well. Yes they are cheaper but when you get less fuel economy are they really cheaper?
Recommended plugs are Denso or NGK Iridium plugs. Now when you change them, You want to use a little bit of anti-seize lubricant on the threads to make sure they do not get stuck for easy changeouts later. Yes you do not have to do this but it is the proper way to do it and the way the dealer does it.
A small tidbit for you, Boosted K series engines like Turbocharged or Supercharged typically require the same type of plugs but with a different heat range. Boosted applications prefer a "colder" plug like NGK BKR8EIX or BKR9EIX
A spark plug’s heat range is the degree to which it can disperse heat. Spark plugs with high heat dispersal are referred to as cold, while plugs with less heat-dissipating characteristics are known as hot.
The component arrangement of the spark plug affects its heat rating:
- Length of insulator nose
- Surface area
- Material of center electrode
- Position of the insulator tip
I also recommend even if you are NOT replacing the coil packs to use dielectric grease to help prevent the boot sticking to the plug and possibly damaging the boot on the coil pack and ensuring a good seal. I have seen many times the boot tip on the end of the coil pack getting stuck on the end of the plug making you go fishing to get the boot out before you can get the socket on the plug to remove it. Not much fun and could have been avoided had the last person serviced the vehicle correctly. If this happens, replace the coil pack and do not use coil packs that do not have the rubber boot on the end.
Spark plug socket size for K series engines is 5/8ths If you have a cheap one with the rubber holder in the end just remove the rubber holder because it might be stuck on the plug when you install it because they are trash sockets. If you do not have the rubber part you can just pull the plug out after being loose with the coil pack itself of a piece of rubber line. Do not just drop the plug in the hole as you might damage the tip of the plug making the gap closer. Be gentle.
Coil packs:
Honda OEM coil packs will either last you the life of your vehicle or they will die around the 160k mark on a poorly maintenance vehicle. Common causes are cracks, missing or worn out boots, or extreme heat. Not changing your plugs regularly also causes pre mature failure due the face the pack cannot completely discharge each firing. If you are having an issue, remove each pack with a 10mm socket and check to make sure it has its boot, there are no cracks, the plugs are in good shape and there is no moisture. Also make sure the pack is plugged in correctly that the plug locks into place. You can also try swapping the coil packs around to make sure its not mechanical.
Don't mess around with cheap coil packs, they do not tend to last. You can find good used OEM ones or buy new: Denso k20/K24 Coil NGK K24/K20 Coil And like stated above make sure you use dielectric grease when installing on the bottom boot to the spark plug.
We also have the Blox Aftermarket Coil Packs
Knock Sensor:
Welcome to the curse of Code P0325 that means means that there is a malfunction within the knock sensor 1 in circuit bank 1. What does this mean you ask? This means either the sensor has decided to leave this world OR, the ECU is not getting the signal because Honda decided to use a sub harness for the charging/starting systems and included in that sub harness is the testy knock sensor wire. This plug is exposed to heat and the elements and often corrosion is the culprit.
So what should you replace? Yes. Replace both. What we tend to do is bypass the plug that the sub harness connects to and go direct from the harness wire to the knock sensor itself with a new pigtail. Knock sensor Plug assembly This will require some soldering as you CANNOT use a butt connector as the signal depends on a good connection hence where there is an issue at the corroded plug. You cannot just buy this at auto part stores so if your going to have a mechanic do it make sure you get the plug FIRST.
The knock sensor itself is a pain in the ass to change. Its up under the manifold next to the starter. You can get it from the bottom with a good socket and a wobble extension but you will be fighting to do it. Its a 15/16 socket or 24MM you will need a deep to medium socket to reach.
The absolute easiest way to do this is to pull off the bumper, remove the radiator and the ac condenser. This is ALSO the same way you change out the probably bad or failing AC compressor that's making life miserable on hot days because Honda K series AC compressors are literally the worst but this is covered under AC.
In the pictures you can see the front of a Honda Element and the location of the knock sensor under the manifold. You can also see the plugs of the sub harness. the top plug you want to cut and splice on the side of the plug you can see to the knock sensor. The wire colors vary just make sure you look at your stock plug and match up the wire and the color from the plug. Solder and heat wrap properly.
When it comes to the knock sensor itself. DO NOT BUY EBAY OR AMAZON CHEAP.. half the time they do not work and you did all that work of changing it for nothing. Do not waste your time and money and buy a good one the first time. Also, do not drop it. If you drop it you will most likely ruin it. We have both Aftermarket and OEM Sensors. As well as the Ktuned version with pigtail
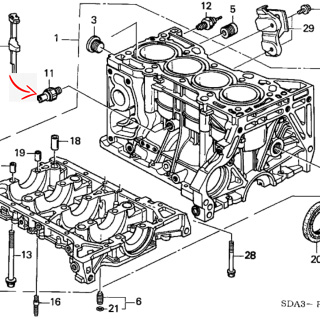

If none of this works, then you need to trace out the plug from the end of the sensor plug to the ECU. Or in VERY rare occasions the ECU goes bad for knock sensor pin.
Catalytic Converter Replacement and 02 Sensors.
If you are reading this because you have been a victim of catalytic converter theft then you have my condolences. However, many times they need to be replaced anyway and are blocked and possibly effecting your fuel economy and performance. They are supposed to be replaced every 150K so you are most likely well beyond that. The other bit of good news is that converter thieves often will not steal aftermarket converters because they do not have the same materials in them the factory ones do. You can go to a muffler shop and get totally ripped off having them weld in a universal or you can just buy an entire replacement pipe section. The issue is that the bolts that bolt the pipe to the manifold tend to rust up and snap clean off and this happens at least 50% of the time no matter how much wd40 you soak it with. IF you want to attempt this yourself the best advice i can give you is to break the bolts loose when the exhaust is hot.. go run the shit out of it for 10 minutes then immediately jack it up, put it on stands and try to break them loose. OR if you have a propane torch just get it hot, NOT RED HOT because that just fatigues the bolts and will make them snap even easier. To be clear you are not heating the bolt HEADS you are heating the section of the manifold the bolts thread into. IF they snap, the best solution is to just drill them out and get new bolts with nuts and a washer that can hold the spring. The pipe to manifold needs to have the ability to flex with the engine.
We have a few options available for you
2002-2006 Honda CR-V Replacement Catalytic Converter
2007-2009 Honda CR-V Replacement Catalytic Converter
2003-2011 Honda Element Replacement Catalytic Converter
Replacing your 02 sensors when you install a new converter is a must. You also probably might need to replace them since they are a common emission problem on most K series Honda vehicles and replacing your 02 sensors are a MUST. We have a good quality set of 02 sensors that fit multiple Honda vehicles with K series engines from 02-11. IF you replace one you NEED to replace the other even if you do not have a code for it. They work together to read before and after the cat for un burned hydrocarbons. Replacement 02 sensors
V-tec System and Variable Timing (VTC) Honda codes P1259 P1009 P2646
Welcome to the most irritating part of owning any K series vehicle that is starting to get up there in miles. Leaking Vtec seals, Failed solenoids, plugged screens, and VTC gears that get stuck. And the crazy part is that ALL of them can be avoided by taking care of your vehicle and servicing it when you are supposed too. Low oil levels, wrong oil, dirty oil or shitty filters can also cause issues. Code P1259 Vtec system malfunction can usually be solved easily. This code will also make it so you cannot rev over 2800RPM
Lets start with the V-tec solenoid itself. Its located on back left of the engine if you are facing it from the front of the vehicle. It has two plugs on top and is easy to get too. It has a heat shield to protect is since its right by the exhaust manifold. Hot oil is constantly being baked inside this thing and it has a rubber seal like other systems. It also has a built in screen to filter out particulates in the oil that might damage the solenoid built into the gasket. Pics of location, Its 3 10mm bolts and two plugs located on the top. There is a harness clip on the heatshield for the harness rout to the oil pressure sensor you will need to remove. You are probably going to break the clip.

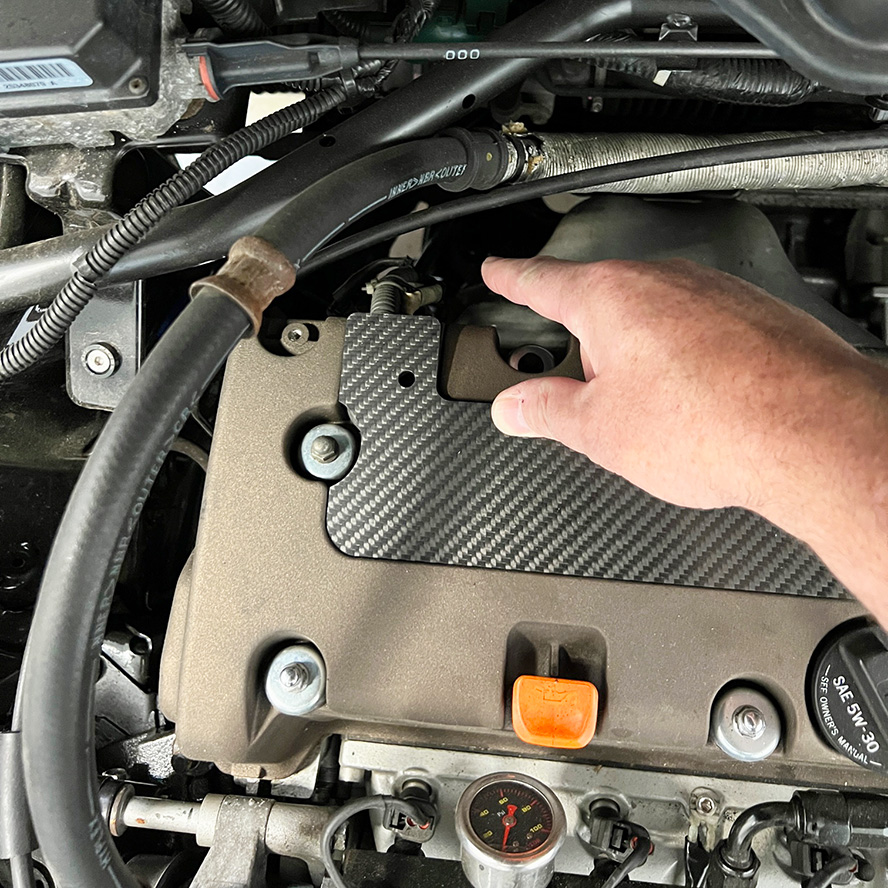


As you can see on our project Element where the solenoid is located. You probably want to wait until the engine is cool since you will be right next to the exhaust manifold. You can also get to it from the bottom if you need to be able to see the bolts to remove it. When you remove the bolts it will be semi stuck and oil will drip so make sure you have something under it so you do not get oil on the ground if you worried about that. You can see that the gasket on this solenoid has been leaking and the valve cover has also been leaking oil onto the solenoid itself. If you have oil on the top of your solenoid its a tell tale that you valve cover gasket is leaking as well. If you have oil leaking down the side of your timing cover or the back of the engine then its probably the gasket for the valve cover and the vtec solenoid and you should just replace both. CHANGE YOUR OIL REGULARLY EVEN IF IT BURNS OIL QUICKLY YOU CANNOT JUST KEEP ADDING TO IT.
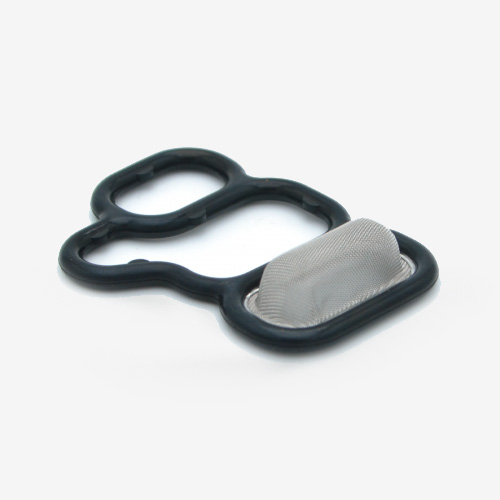
Here is a a new OEM gasket 15815-RAA-A02 vs a recently replaced solenoid gasket on our own CRV with 220k miles. You can see how the screen is blocked with grime and the gasket was coming apart and leaking down the back side of the engine. DO YOURSELF A FAVOR AND DO NOT BUY EBAY OR AMAZON HONDA PARTS THEY ARE USUALLY NOT REAL JUST AFTERMARKET WITH FAKE HONDA LABELS.
Before changing the gasket and re installing the solenoid make sure it is clear of debris and spray it out with some carb cleaner. I suggest b12 Chemtool spray not the bucket. Clean it out as best as you can before installing the new gasket. You do not need to put any silicone on a new OEM gasket for it to seal properly. Make sure you tighten all 3 bolts the same so you do not crush just one side of the gasket more than the others. Torque is 7.2ftlbs but honestly its just hand tight and an 1/8th turn.
If you are still having issues you might have to just replace your entire solenoid.
P1009 VTC advance malfunction P2646 Rocker Arm Stuck
This is by far one of the most advanced repairs you will have to make eventually. Most people just do the entire timing chain assembly and replace this gear (located on intake camshaft) but sometimes budgets make it so we just replace this one part. Now there are MANY different gears depending on vehicle and market and many tuners prefer the 50 degree RBC one when doing aftermarket and performance applications but when just making a repair you want to make sure you get the right one. VTC Replacement gear we let you select the right gear by selecting your vehicle. There are a few ways of changing this out but he shortcut version seems to be the most prominent.
This is one of the best videos for replacing this unit. https://www.youtube.com/watch?v=F_tLYzlpldM&t=1227s
There are some things we suggest that the video leaves out, for one you 100% want to spray inside the cam and use a pick or a cotton swap or something to clean out the nasty sludge that probably caused the problem in the first place. Once you remove the bolt and the gear get some spray like carb cleaner or b12 Chemtool that has a straw and spray where the bolt was and make sure its CLEAN in there before you put in the new gear. You do NOT have to replace the bolt just make sure the thread is completely clean if you are going to re-use it. Torque the bolt with the gear UNLOCKED then lock it this is insanely important and I found out first hand.
Now you can CLEAN your gear if you confident to pull it all apart but when you reassemble it you have to do it very specifically and torque the bolts. I had a friend who cleaned his and didn't get the bolts tight enough and the gear came apart and ruined his engine. I am not going to suggest this is what you do but if you are in the pinch it can work. There are videos on how to do it BUT I suggest you buy a new gear.
Now there is one other spot that can cause issues and that is on the front left of the head there is another oil passage area with a gasket and a screen that can clog. This feeds the VTC advance gear but you have to remove the PS pump to get to it. This does not clog easily and often enough I have found that they do not need to be cleaned but it is there and the 2 minutes it takes to remove and clean are worth it.

Timing Chain Components
Tick Tick Rattle Rattle whos that? its your timing chain tensioner sending you a suicide note on start up. Tick Tick Rattle Rattle after revving it up a little? Probably your tensioner AND your guides. You can replace JUST your tensioner, there is a door on the front of the timing chain cover that you can remove with 3 10mm bolts and you can just put in a brand new one BUT if you chain components are bad and you have a 200k engine that's NEVER had a timing chain its a moot point to replace just the tensioner. A timing chain replacement is not the hardest thing in the world but its also not easy with the engine in the car and requires some finesse to do. Just getting the driver side engine mount bracket off is the hardest part. We have multiple options for tensioners and entire timing chain sets with OEM components. DO NOT BUY CHEAP EBAY OR AMAZON COMPONENTS THEY WILL FAIL PREMATURELY
Pro tip: When installing a new tensioner by itself from the access door, TDC (top dead center) the engine clockwise and then rotate the engine just slight counterclockwise and you will be able to put a push pin the in the tensioner to take it out easier. Crank bolt is a 19MM
Valve Tick
So when your vehicle is idling and you hear a tick tick tick but its too fast to be any kind of rod knock or any major issues you have a noise valve train. How this works is the cam rotates and on the lobe to open the valve the cam comes up against a rocker arm that is over top of the valve. The rocker arm actually pushes down on the valve against the valve spring and opens the valve and when the lobe on the cam goes by the rocker lets off the valve and spring and the spring makes the valve close. The tick tick is the gap between the rocker and the camshaft is too wide and out of spec. The rocker arms can be adjusted via a jam nut on the end of the rocker arm this is a called simply a valve adjustment. A valve adjustment is not a difficult thing it just requires a set of feeler gauges and a jam nut tool. The object is to adjust the rocker arms so you have the correct distance between the cam and the rocker arm to remove the tick tick from the rocker slapping the cam every rotation.
But there is a catch on OLDER higher mileage Honda K series engines and that is that the cams like to start to disintegrate as show in the picture below. As you can see the love on the cam is starting to get damaged and sometimes they just wear grooves in them. How does this happen? well oil starvation for one, driving too long without a valve adjustment second and third just plain mileage. The cam is not in any danger of breaking or anything but adjusting them at this point is a bit more difficult but can be done. Its not like its going to get any better on its own but you can buy yourself some time. But remember that missing material is somewhere inside your engine now floating around ruining other shit (like your solenoid gasket, your VTC gear and more) hat should you do? get some new cams, swap in a lower mileage engine? YES. If you want to get a significant amount of miles more out of your engine this is a problem you need to address soon but at the very least adjust your valves asap. We have an available adjustment tool and the proper shims. Standard is .008 Intake and .010 exhaust.
This is the best video I have found on the subject as it is done by an actual Honda Master Tech https://www.youtube.com/watch?v=D20XiVWwuvM&t=1423s
Oil and Oil Consumption
If this is your first K series vehicle the oil consumption rate might a bit of a shock to you, but I assure you its pretty typical K series engine behavior. Now it might be tempting to just keep adding oil since it consumes it and you might be thinking why do an oil change.. The answer is simple, you will kill the Vtec system and the VTC gear along with cause damage to things like your cams and whatnot.
Head Bolt Torque Specs:
OEM Cylinder Head Bolts: 29ft/lbs then do a 90 deg turn + another 90 deg Turn (One extra 90 deg on new bolts) There is No FINAL torque spec. You can do this manually but I would suggest just going ARP if you do not have a torque wrench capable of doing degree pulls. Make sure the threads have some oil on them and the washer/bolt head contact area but are not sloppy wet and the holes are clean and dry.
ARP Head bolts: (This applies to K20 and K24): Read carefully!!! There is a right way and a wrong way to do this. Do not slather your bolts with ARP lube and if you are re using them make sure you clean off ALL the old lube. Clean the head bolt holes, the best way is to spray some cleaner in there and let it sit and then blow them out with air. Wrap a towel around the sprayer to make sure you don't just spray dirty shit all over your engine bay and face. People pay extra for that.
Now insert the studs DRY.. YES DRY. and use the Allen head in the top of the stud to tighten to about 10flbs.. so snug.. not bashed in you want them to be able to come out someday.
You put the ARP lube on ONLY THE NUTS. Do not lube the stud just then nuts.. make sure there is some on the bottom edge of the nut so you do not have dry contact between the nut and the washer. You can also have a little bit of oil to ensure smooth torque.
Now using the factory order tighten all to 30ft/lbs then all to 60ft/lbs and then all to 80ft/lbs.. I tend to let them sit for an hour and check them again.
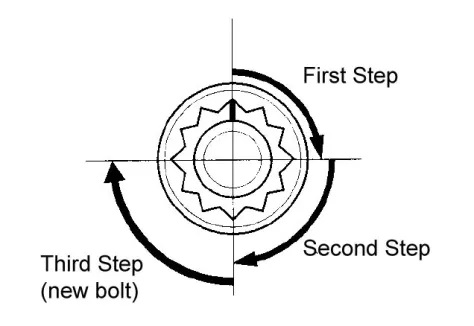

Torque specs continued:
Cam holder bolts torque: 12mm 16ft/lbs, 10mm 8.7ft/lbs
Valve adjustment lock nut torque: 14ft/lbs
Intake Cam Gear torque: 83ft/lbs
Exhaust Cam Gear torque : 51ft/lbs)
Valve cover bolts torque: 10mm 8.7ft/lbs
Spark Plugs torque: 17ft/lbs
Connecting rod and main cap Torque specs: Same as the factory head bolts there is a torque spec and then a degree that must be met.
Main cap bolts: 12MM 22ft/lbs and then 56 deg turn
Rod bolts: 22ft/lbs and then 90 deg turn
ARP ROD BOLTS: So this is complicated and I am not going to give you an actual torque spec. APR suggests reading the torque in bolt stretch, and here is a video that explains it: Ultimate K20/K24 Build Guide! PT.8 (Stretching Rod Bolts)
Do not ask me for torque on eBay rods with knock off bolts.
Honestly, On most K series with ARP rod bolts, I torque them to 15 then 30.. back off and then 15 and 30 again. I am not saying it is the right way its just what I do.
Timing Chain replacement for K24 and K20 engines.
CRV timing chain replacement, Honda Element Timing chain replacement, TSX timing chain replacement, RSX Timing chain replacement, Civic Si timing chain replacement, RDX timing chain replacement, K24 Timing chain replacement, K20 Timing chain replacement
We sell full OEM timing chain kits with everything you need and the tools you need to do it
Removal:
Depending on how you are doing it and most of you will be doing this in the car how you get the cover off is your prerogative. You will need to loosen the passenger side engine mount and remove the bracket and use a jack to move the engine up and down to be able to get to all the bolts.
Tips:
Drain the oil, yes you do not have to but just do it.
Remove passenger side wheel and the plastic covers to work easier.
Its easier to do this if you remove the power steering pump its just gives you better angles AND you can clean the VTC strainer at the same time.
Power wash your engine bay first and degrease the hell out of the passenger side cover area to work easier.
Make sure you have 2 breaker bars and a Honda Crank tool. to remove the super stubborn crank bolt. If you get this off the rest is a breeze.
You should remove your VTC gear and clean it or replace it if your over 200k miles while you are inside the engine.
Check your cams for pitting and damage
do a valve adjustment after because your already in there Tools Here
Be clean, and methodical and get the oil residue off so your silicone seals correctly. Use a wire brush or a razor blade to get all the old material off.
Make sure the old material doesn't fall into the oil pan so the oil pump doesn't suck it up. yes there is a screen there but it still impedes flow.
Pull the valve cover first, Then take off the cover bolts and note their orientation. The bottom ones are specific. Remove the VTC
Step 1:
Set the crankshaft to top dead center TDC. Align the TDC mark A on the crankshaft sprocket with the pointer B on the cylinder block.

Step 2:
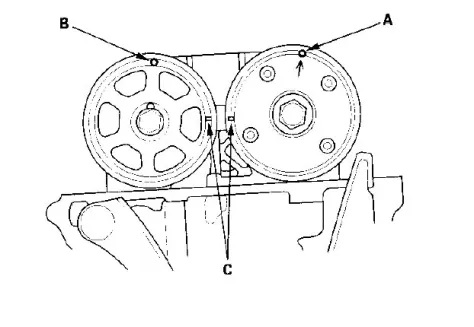
Set the cams to TDC. The punch mark (A) marked with an arrow on the VTC actuator and the punch mark (B) on the exhaust cam sprocket should be at the top. Align the TDC marks (C) on the VTC actuator and exhaust cam sprocket.
!!!! VTC ACTUATOR ON THE INTAKE CAM NEEDS TO BE IN THE UNLOCKED POSITION !!!!
Step 3:
Once the engine is set at TDC, it’s time to install the cam chain. Install the cam chain on the crank sprocket with the colored piece (gold or black chain link) (A) aligned with the punch mark on the crank sprocket.
Next, install the timing chain on the VTC actuator and exhaust cam sprocket with the punch marks (A) aligned with the two colored pieces (gold or black chain link) (B).
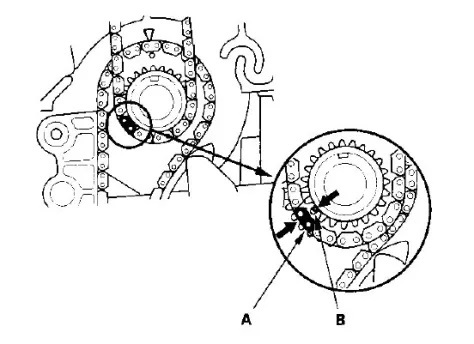

Now you can install the cam chain guide A (A) and the tensioner arm (B).

Now install the auto tensioner.. USE A NEW OEM OR QUALITY AFTERMARKET ONE NO "OEM" cheap ebay one its not real.

Install the top chain guide

Remove pin from auto tensioner (looks like a green push pin usually if its OEM)

Now for the rest of the components and chain cover.
Make sure to reinstall the camshaft position sensor sprocket. Face the sprocket accordingly, with the side labeled OUTSIDE… facing outside.
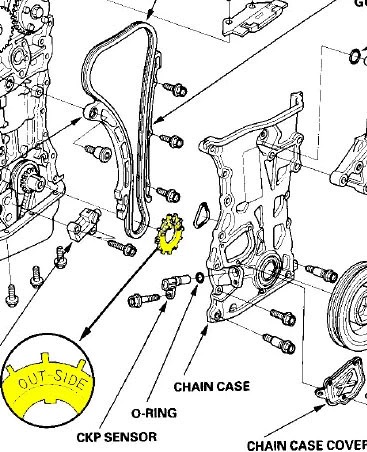
Replace the rubber gaskets on the chain case and the front main seal. Remove old liquid gasket from the chain case mating surface, bolts and bolt holes. Clean and dry the timing chain cover surfaces with carb cleaner. SILICONE GASKET MATERIAL WILL NOT STICK TO OIL AND YOU WILL NOT GET A PROPER SEAL
Apply Hondabond evenly to the cylinder block mating surface of the chain case and to the inner threads of the holes. Make sure you get a little bit in extra in the corners if you DID NOT remove the oil pan completely.

The crank pulley can now be put on and torque to the proper specifications.
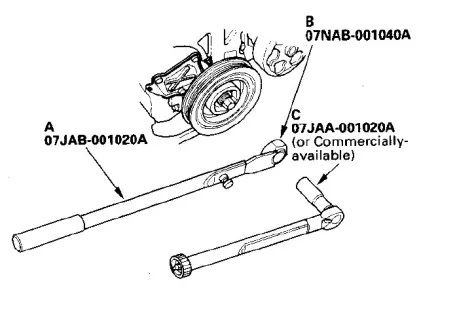
Make sure to align the key and crank pulley when reinstalling. Torque crank pulley bolt to 181lbf.ft. You need to use a Honda crank tool to hold the pulley with a breaker bar
DO NOT USE AN IMPACT WRENCH USE A GODDAMN TORQUE WRENCH AND NO THREADLOCKER ITS NOT GOING TO FALL OFF.
Now your done.
Clutch and flywheel bolts:
Flywheel bolts (tighten in alternating side pattern like drawing a star) 17mm 12 point 87ft/lbs
Pressure plate bolts 10mm 12 point step tighten 10ft/lbs - 14ft/lbs - 19/ftlbs
Removing the crank bolt on K24 and k20 engines:
Crank bolt removal k24, Crank bolt removal k20,
You will need a crank holding tool found on our store, a 19MM half inch socket and two breaker bars and hopefully a friend.
It will break loose it just might take more force then you expect and some handle extensions.
